Advance VPN Panel For Resellers
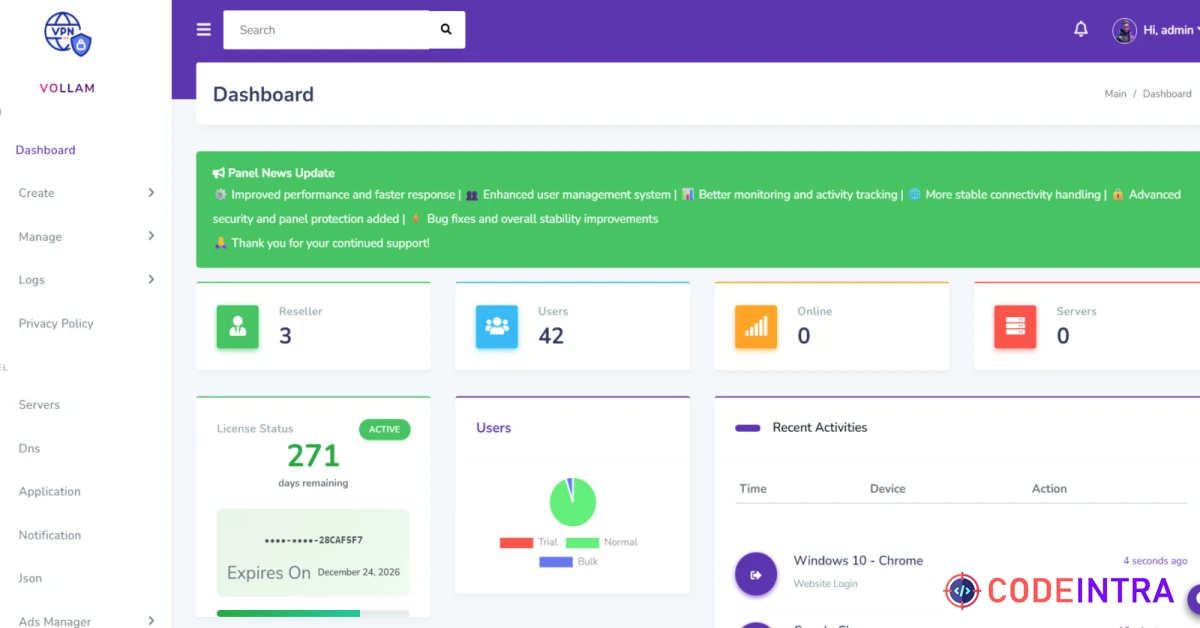
Advance VPN Panel Manage your whole VPN Business a Panel
Make Someone's Day
Make someone's day by sharing this incredible item with them!
🚀 VPN Panel Pro - Complete VPN Management System
Professional VPN Business Solution
A comprehensive, production-ready VPN management panel designed for resellers, businesses, and VPN service providers and built with modern PHP, featuring automated server deployment, GitHub integration, multi-protocol support, and advanced user management. Launch your VPN business in minutes!
🔐 Supported VPN Protocols & Tunnels
Industry-leading protocol support for maximum compatibility and security:
- 🔒 OpenVPN TCP - Reliable, firewall-friendly protocol for stable connections
- ⚡ OpenVPN UDP - Fast, low-latency protocol for streaming and gaming
- 🛡️ OpenVPN SSL/TLS - Encrypted SSL tunnel for maximum security
- 🚀 V2Ray/VMess - Advanced protocol with built-in obfuscation
- 💎 VLESS - Lightweight protocol with minimal overhead
- ⚡ Hysteria - High-performance UDP-based protocol
- 🔥 Hysteria2 - Next-generation protocol with improved speed
- 🐉 Salamander - Advanced obfuscation for bypassing DPI
- 🌐 WebSocket - HTTP-based tunneling for restrictive networks
- 🔧 Custom Obfuscation - Configurable obfuscation methods
📡 Default Port Configuration
- TCP Port: 443 (HTTPS Standard)
- UDP Port: 7300 (High Speed)
- SSL Port: 444 (Secure Tunnel)
- HTTP Port: 80 (WebSocket)
- Custom Ports: Any port 1-65535 (fully customizable)
✨ All ports are fully customizable during server installation
📋 What is VPN Panel Pro?
VPN Panel Pro is a powerful, feature-rich VPN management system that allows you to:
- Manage unlimited VPN servers across multiple locations worldwide
- Create and manage reseller accounts with custom permissions and pricing
- Automate server installation and configuration via SSH (one-click deployment)
- Track user connections in real-time with live monitoring dashboard
- Generate revenue through built-in multi-level reseller system
- Integrate with GitHub for automated script management and versioning
- Support 10+ VPN protocols (OpenVPN, V2Ray, Hysteria, VLESS, etc.)
- Manage user accounts with expiration dates, credits, and device limits
🎯 Perfect For:
🌐 VPN Service Providers
Launch your own VPN business with complete control over servers, users, and pricing
💼 Resellers
Manage multiple clients and sub-resellers efficiently with credit-based system
🖥️ System Administrators
Centralized VPN infrastructure management with automated deployment
🏢 Hosting Companies
Offer VPN services to your customers as an additional revenue stream
👨💻 Developers
Customizable codebase with clean architecture and comprehensive API
🚀 Entrepreneurs
Start your VPN business today with minimal technical knowledge required
💎 Key Highlights
- Automated Server Deployment: One-click server installation via SSH with automatic configuration
- GitHub Integration: Automatic script versioning, deployment logging, and repository management
- Multi-Protocol Support: OpenVPN (TCP/UDP/SSL), V2Ray, Hysteria, Hysteria2, VLESS, Salamander Obfuscation
- Reseller System: Multi-level reseller management with credit system and custom pricing
- Real-time Monitoring: Live user connection tracking, bandwidth monitoring, and server status
- Advanced Security: Cloudflare Turnstile, license validation, encrypted storage, DevTools protection
- Responsive Design: Modern UI that works perfectly on all devices (desktop, tablet, mobile)
- API Integration: RESTful APIs for external integrations and custom applications
- Cloudflare DNS: Automated subdomain creation and DNS management
- Database Backup: Automated backup system with email delivery and cron job support
🔧 Technology Stack
Built with modern, reliable technologies:
- PHP 7.4+ / 8.0+ / 8.1+
- MySQL 5.7+ / MariaDB 10.3+
- Bootstrap 4 Framework
- jQuery & AJAX
- Smarty Template Engine
- SSH2 Extension
- cURL for API calls
- GitHub API Integration
- Cloudflare API Integration
- RESTful API Architecture
- JSON Data Exchange
- SweetAlert2 Notifications
📊 What You Get
- ✅ Complete source code with clean, well-documented PHP
- ✅ Modern responsive admin panel with beautiful UI
- ✅ User management dashboard with advanced filtering
- ✅ Reseller management system with credit tracking
- ✅ Server management interface with one-click installation
- ✅ Automated installation scripts for Debian/Ubuntu (10+ protocols)
- ✅ GitHub integration for script management and versioning
- ✅ Database backup system with automated email delivery
- ✅ License management and validation system
- ✅ Comprehensive documentation (Installation, API, Features)
- ✅ Developer settings panel for easy configuration
- ✅ Free updates and bug fixes for 6 months
- ✅ Professional support via email/ticket system
🌟 Why Choose VPN Panel Pro?
- Production Ready: Tested and used by real VPN providers serving thousands of users
- Scalable Architecture: Handle unlimited users and servers effortlessly
- Easy Customization: Clean code structure for easy modifications and branding
- Active Development: Regular updates, new features, and security patches
- Professional Support: Dedicated support for setup, customization, and troubleshooting
- Cost Effective: One-time payment, no recurring fees or subscriptions
- White Label Ready: Fully customizable branding (logo, colors, name)
- Multi-Language Ready: Template structure supports easy translation
- SEO Friendly: Clean URLs and optimized code structure
- Mobile Optimized: Fully responsive design for all screen sizes
🎁 Bonus Features Included
- ☁️ Cloudflare DNS integration for automated subdomain management
- 💾 Automated database backup with email delivery and cron support
- ⚙️ Developer settings panel for API configuration and GitHub integration
- 🌍 Multi-language support ready (Smarty template system)
- 🎨 Dark/Light theme support with customizable colors
- 🔐 Advanced security features (DevTools protection, source code protection)
- 📊 Real-time activity logging and monitoring
- 👥 Bulk user creation and management tools
📞 Support & Updates
We provide comprehensive support including:
- Installation assistance and server setup guidance
- Configuration help for GitHub, Cloudflare, and other integrations
- Bug fixes and security patches (priority support)
- Feature updates and enhancements (regular releases)
- Documentation updates and video tutorials
- Email/ticket support with 24-48 hour response time
🚀 Start Your VPN Business Today!
Professional, scalable, and easy to use. Everything you need to launch and manage a successful VPN service in one comprehensive package.
Get started in just 15-30 minutes with our step-by-step installation guide!
Features
🌟 Complete Feature List - VPN Panel Pro
Over 150+ Professional Features for Your VPN Business
🔐 VPN PROTOCOLS & TUNNELING
Industry-leading protocol support with advanced tunneling and obfuscation:
Supported Protocols:
- 🔒 OpenVPN TCP - Reliable, firewall-friendly protocol for stable connections
- ⚡ OpenVPN UDP - Fast, low-latency protocol for streaming and gaming
- 🛡️ OpenVPN SSL/TLS - Encrypted SSL tunnel for maximum security
- 🚀 V2Ray/VMess - Advanced protocol with built-in obfuscation
- 💎 VLESS - Lightweight protocol with minimal overhead
- ⚡ Hysteria - High-performance UDP-based protocol
- 🔥 Hysteria2 - Next-generation protocol with improved speed
- 🐉 Salamander - Advanced obfuscation for bypassing DPI
- 🌐 WebSocket - HTTP-based tunneling for restrictive networks
- 🔧 Custom Obfuscation - Configurable obfuscation methods
📡 PORT CONFIGURATION
Flexible port configuration with smart defaults and custom options:
| Port Type | Default Port | Protocol | Customizable |
|---|---|---|---|
| TCP Port | 443 | OpenVPN TCP, HTTPS | ✓ Yes |
| UDP Port | 7300 | OpenVPN UDP, Hysteria | ✓ Yes |
| SSL Port | 444 | OpenVPN SSL/TLS | ✓ Yes |
| HTTP Port | 80 | WebSocket, HTTP | ✓ Yes |
| Proxy Port | 8080 | SOCKS, HTTP Proxy | ✓ Yes |
| Custom Ports | 1-65535 | Any protocol | ✓ Yes |
✨ All ports are fully customizable during server installation. Support for multiple ports per server.
📜 INSTALLATION SCRIPTS
Automated installation scripts for all major VPN protocols and services:
- debian_ovpn - OpenVPN installation for Debian/Ubuntu with TCP, UDP, and SSL support
- v2ray_install - V2Ray/VMess protocol installation with WebSocket and TLS
- vless_setup - VLESS protocol installation with XTLS support
- hysteria_install - Hysteria protocol installation for high-speed connections
- hysteria2_setup - Hysteria2 next-generation protocol installation
- obfs_salamander - Salamander obfuscation plugin installation
- multi_protocol - Combined installation of multiple protocols on one server
- custom_config - Custom configuration script for advanced setups
🔧 All scripts are stored in GitHub and automatically deployed to servers via SSH
🎛️ CORE PANEL FEATURES
👥 User Management
- Create unlimited user accounts
- Set expiration dates and validity periods
- Assign custom duration (days/months/years)
- User status tracking (Active/Expired/Blocked)
- Device connection limits per user
- Bulk user creation and import
- Trial account support
- User search and advanced filtering
- User activity logs and history
🏢 Reseller System
- Multi-level reseller hierarchy
- Credit-based system
- Custom pricing per reseller
- Reseller dashboard with statistics
- Sub-reseller management
- Commission tracking and reports
- Credit transfer system
- Reseller activity logs
- Custom reseller permissions
🖥️ Server Management
- Unlimited server support
- One-click server installation
- SSH-based automation
- Multiple server locations
- Server status monitoring
- Custom server flags/icons
- Server restart functionality
- Bulk server operations
- Server load balancing
🚀 AUTOMATION & INTEGRATION
🐙 GitHub Integration
- Automatic script versioning and storage
- GitHub repository management
- Automated commit logging
- Script download from private repos
- Token-based authentication
- Dynamic repository domain configuration
- Branch management (server_script)
- Automated deployment tracking
⚙️ Server Automation
- SSH-based remote execution
- Automated script deployment
- One-click server setup
- Automatic configuration generation
- Service installation (Debian/Ubuntu)
- Port configuration automation
- Firewall rule automation
- Service restart automation
☁️ Cloudflare Integration
- DNS record management
- Subdomain automation
- Zone ID configuration
- Global API support
- Turnstile CAPTCHA integration
- DDoS protection
- SSL/TLS certificate automation
📊 DASHBOARD & MONITORING
📈 Admin Dashboard
- Real-time statistics
- Total users/resellers count
- Active connections monitoring
- Server status overview
- Recent activity logs
- Revenue tracking
- System health monitoring
- Beautiful charts and graphs
📡 User Activity Tracking
- Live connection status
- Device connection tracking
- Login history
- Bandwidth monitoring
- Connection duration logs
- IP address tracking
- Connection quality metrics
🔔 Notification System
- Real-time notifications
- Email notifications
- Popup notices
- System alerts
- User expiration reminders
- Server status alerts
- Custom notification rules
💎 PREMIUM FEATURES
🔐 Advanced Security
- Session management
- Password encryption (AES-256)
- SQL injection protection
- XSS prevention
- CSRF token protection
- Cloudflare Turnstile CAPTCHA
- License validation system
- IP-based access control
- DevTools protection
- Source code protection
🎨 User Interface
- Modern responsive design
- Bootstrap 4 framework
- Mobile-friendly interface
- Dark/Light theme support
- Customizable branding
- Clean navigation
- SweetAlert2 notifications
- DataTables integration
- AJAX-based operations
- Smooth animations
🔧 Developer Tools
- RESTful API endpoints
- API documentation
- Webhook support
- Custom API integration
- Database backup system
- Automated backups via cron
- Debug mode
- Error logging
- Activity logging
- Performance monitoring
📱 ADDITIONAL FEATURES
- Multi-language support ready (Smarty template system)
- Custom CSS/JS support for branding
- Advanced search functionality across all modules
- Data export options (CSV, Excel, PDF)
- Pagination support for large datasets
- Sorting and filtering on all tables
- Bulk operations (delete, update, export)
- Comprehensive activity logging
- Error logging and debugging tools
- Cache management system
- Configuration backup/restore
- System maintenance mode
- Database optimization tools
- Automated cleanup tasks
- Custom email templates
- SMTP configuration
- White-label ready (fully customizable)
- SEO-friendly URLs
- Mobile app API ready
- Third-party integration support
💎 150+ Features Total
Everything you need to run a professional VPN business in one comprehensive package!
All features are production-tested and ready to use. No additional plugins or purchases required.
Requirements
⚙️ System Requirements - VPN Panel Pro
Everything you need to run VPN Panel Pro successfully
📋 Quick Overview
VPN Panel Pro is designed to run on standard web hosting environments. You'll need a web server for the panel and separate VPS servers for VPN services. The panel manages everything remotely via SSH.
🖥️ PANEL SERVER REQUIREMENTS
Requirements for the server hosting the management panel:
🌐 Web Server
- Apache 2.4+ (RECOMMENDED)
- Nginx 1.18+ (supported)
- LiteSpeed (supported)
- mod_rewrite enabled (Apache)
- .htaccess support
- SSL/TLS certificate (recommended)
🐘 PHP Requirements
- PHP 7.4+ (RECOMMENDED)
- PHP 8.0+ (fully supported)
- PHP 8.1+ (tested and working)
- 64-bit PHP installation
- Memory limit: 256MB minimum
- Max execution time: 300 seconds
🗄️ Database
- MySQL 5.7+ (RECOMMENDED)
- MySQL 8.0+ (fully supported)
- MariaDB 10.3+ (supported)
- InnoDB storage engine
- UTF-8 character set
- Database size: 100MB+ free space
🔧 REQUIRED PHP EXTENSIONS
⚠️ Critical Extensions - The following PHP extensions are REQUIRED:
| Extension | Purpose | Status |
|---|---|---|
| mysqli | Database connectivity and operations | REQUIRED |
| curl | HTTP requests, API calls, GitHub integration | REQUIRED |
| ssh2 | Remote server management and automation | REQUIRED |
| json | JSON encoding/decoding for API responses | REQUIRED |
| mbstring | Multi-byte string handling | REQUIRED |
| openssl | Encryption, SSL/TLS, secure connections | REQUIRED |
| pdo_mysql | PDO database abstraction layer | RECOMMENDED |
| gd | Image processing (flags, icons) | RECOMMENDED |
| zip | Backup compression and file handling | RECOMMENDED |
| xml | XML parsing for API responses | RECOMMENDED |
🖥️ VPN SERVER REQUIREMENTS
Requirements for VPS servers that will run VPN services:
🐧 Operating System
- Debian 10 (Buster) - RECOMMENDED
- Debian 11 (Bullseye) - RECOMMENDED
- Ubuntu 20.04 LTS (supported)
- Ubuntu 22.04 LTS (supported)
- Fresh installation (no existing VPN)
- Root access required
💾 Server Specifications
- RAM: 512MB minimum, 1GB+ recommended
- CPU: 1 core minimum, 2+ recommended
- Storage: 10GB minimum, 20GB+ recommended
- Bandwidth: Unlimited or 1TB+ monthly
- Network: 100Mbps+ connection
- IPv4 address (required)
🔐 Access Requirements
- SSH access (port 22)
- Root user or sudo privileges
- Password or SSH key authentication
- Firewall access (if enabled)
- TUN/TAP support enabled
- Virtualization: KVM or dedicated (no OpenVZ)
⚠️ Important VPS Notes
- OpenVZ virtualization is NOT supported (use KVM, Xen, or dedicated servers)
- TUN/TAP must be enabled for OpenVPN to work
- Some providers block VPN traffic - verify before purchasing
- Firewall rules will be automatically configured by installation scripts
🔌 SUPPORTED VPN PROTOCOLS & PORTS
All protocols are installed automatically via SSH. Default ports are configurable.
Supported Protocols:
- 🔒 OpenVPN TCP
- ⚡ OpenVPN UDP
- 🛡️ OpenVPN SSL/TLS
- 🚀 V2Ray/VMess
- 💎 VLESS
- ⚡ Hysteria
- 🔥 Hysteria2
- 🐉 Salamander Obfuscation
- 🌐 WebSocket
- 🔧 Custom Protocols
Default Port Configuration:
| Port Type | Default Port | Protocol | Customizable |
|---|---|---|---|
| TCP Port | 443 | OpenVPN TCP, HTTPS | ✓ Yes |
| UDP Port | 7300 | OpenVPN UDP, Hysteria | ✓ Yes |
| SSL Port | 444 | OpenVPN SSL/TLS | ✓ Yes |
| HTTP Port | 80 | WebSocket, HTTP | ✓ Yes |
| Proxy Port | 8080 | SOCKS, HTTP Proxy | ✓ Yes |
| Custom Ports | 1-65535 | Any protocol | ✓ Yes |
☁️ THIRD-PARTY SERVICES
Optional integrations to enhance functionality:
🐙 GitHub (Required)
- GitHub account (free or paid)
- Personal Access Token (PAT)
- Repository for scripts (public/private)
- Repository for logs (public/private)
- Token scope:
repopermission - Used for: Script storage & versioning
☁️ Cloudflare (Optional)
- Cloudflare account (free plan works)
- Domain added to Cloudflare
- Global API key or API token
- Zone ID for your domain
- Used for: DNS automation, Turnstile
- Turnstile: Bot protection (optional)
🔍 API Layer (Optional)
- API Layer account (free tier available)
- Whois API access key
- Used for: Domain information lookup
- License validation (optional)
- Free tier: 100 requests/month
- Not required for basic operation
🌐 BROWSER COMPATIBILITY
| Browser | Minimum Version | Status |
|---|---|---|
| Google Chrome | 90+ | RECOMMENDED |
| Mozilla Firefox | 88+ | RECOMMENDED |
| Microsoft Edge | 90+ | ✓ Supported |
| Safari | 14+ | ✓ Supported |
| Opera | 76+ | ✓ Supported |
| Mobile Browsers | Latest versions | ✓ Fully Responsive |
🏢 RECOMMENDED HOSTING PROVIDERS
✅ Panel Hosting (Web Server)
- Shared Hosting: Namecheap, Hostinger, SiteGround (budget-friendly)
- VPS Hosting: DigitalOcean, Vultr, Linode (better performance)
- Cloud Hosting: AWS, Google Cloud, Azure (enterprise-grade)
- Managed Hosting: Cloudways, Kinsta (hassle-free)
🖥️ VPN Server Hosting (VPS)
- Budget: Vultr ($3.50/mo), DigitalOcean ($4/mo), Linode ($5/mo)
- Performance: OVH, Hetzner, Contabo (high bandwidth)
- Global: AWS Lightsail, Google Cloud Compute (worldwide locations)
- Privacy: Njalla, 1984 Hosting (privacy-focused)
✅ PRE-INSTALLATION CHECKLIST
- ✓ Web server with PHP 7.4+ and required extensions installed
- ✓ MySQL/MariaDB database created with user credentials
- ✓ SSH2 PHP extension enabled (critical for server management)
- ✓ GitHub account with Personal Access Token (PAT) generated
- ✓ Two GitHub repositories created (scripts and logs)
- ✓ VPS server(s) with Debian/Ubuntu and root SSH access
- ✓ Domain name pointed to panel server (optional but recommended)
- ✓ SSL certificate installed (Let's Encrypt or commercial)
- ✓ Cloudflare account setup (optional, for DNS automation)
- ✓ Email account for notifications and backups
🚀 Ready to Install?
Once you meet these requirements, installation takes only 15-30 minutes!
Follow our step-by-step installation guide for a smooth setup process.
Instructions
📚 Installation Guide - VPN Panel Pro
Complete step-by-step installation in 15-30 minutes
📖 Before You Start
This guide covers complete installation from scratch. Follow each step carefully. Estimated time: 15-30 minutes. Have your server credentials ready.
🎯 INSTALLATION OVERVIEW
- Part 1: Panel Installation - Upload files, set permissions, configure database
- Part 2: Database Setup - Create database, import SQL, configure connection
- Part 3: Initial Configuration - Login, change password, setup GitHub integration
- Part 4: Add VPN Server - Configure VPS, install protocols, verify installation
📦 PART 1: PANEL INSTALLATION
Step 1: Download & Extract Package
- Download VPN Panel Pro ZIP package from marketplace
- Extract the ZIP file to your local computer
- Verify folder structure contains:
- includes/ (Core files & config)
- serverside/ (Backend logic)
- templates/ (UI templates)
- dist/ (CSS, JS, assets)
- api/ (API endpoints)
- content/ (Page content)
- database.sql (Database structure)
- README.md (Documentation)
Step 2: Upload Files to Server
Method 1: FTP/SFTP (Recommended)
- Connect to server using FTP client (FileZilla, WinSCP, Cyberduck)
- Navigate to web root directory:
- cPanel/DirectAdmin:
/public_html/ - Custom VPS:
/var/www/html/ - Nginx:
/usr/share/nginx/html/
- cPanel/DirectAdmin:
- Upload ALL files and folders to web root
- Wait for upload completion (5-10 minutes)
Method 2: cPanel File Manager
- Login to cPanel control panel
- Open "File Manager" tool
- Navigate to
public_htmldirectory - Click "Upload" button and select ZIP file
- After upload, right-click ZIP → "Extract"
- Move extracted files to
public_htmlroot - Delete the ZIP file
⚠️ Important: Files must be in root directory (e.g., yourdomain.com), NOT in a subfolder (e.g., yourdomain.com/panel/).
Step 3: Set File Permissions (CHMOD)
| Folder/File | Permission | Purpose |
|---|---|---|
/includes/ |
755 | Configuration files |
/templates_c/ |
777 | Template cache (writable) |
/logs/ |
777 | Log files (writable) |
/includes/backup/ |
777 | Database backups (writable) |
/dist/ |
755 | Static assets |
/includes/config.php |
644 | Configuration file (security) |
💡 How to set permissions in cPanel:
- Right-click folder → "Change Permissions"
- Enter permission number (e.g., 777)
- Check "Recurse into subdirectories" for folders
- Click "Change Permissions" button
🗄️ PART 2: DATABASE SETUP
Step 4: Create MySQL Database
Using cPanel MySQL Databases:
- Login to cPanel control panel
- Find and click "MySQL Databases" icon
- Under "Create New Database" section:
- Database Name:
vpn_panel(or your choice) - Click "Create Database" button
- Note the full database name (usually:
username_vpn_panel)
- Database Name:
- Scroll to "MySQL Users" section
- Create new database user:
- Username:
vpn_user(or your choice) - Password: Generate strong password (use Password Generator)
- Click "Create User" button
- Username:
- Scroll to "Add User To Database" section
- Select user and database you just created
- Click "Add" button
- On privileges page, select "ALL PRIVILEGES"
- Click "Make Changes" button
✓ Save Database Credentials:
- Database Host:
localhost(usually) - Database Name:
username_vpn_panel - Database User:
username_vpn_user - Database Password:
your_generated_password
Step 5: Import Database Structure
Using phpMyAdmin:
- Login to cPanel and open "phpMyAdmin"
- Select your database from left sidebar
- Click "Import" tab at the top
- Click "Choose File" button
- Select
database.sqlfrom extracted package - Scroll down and click "Go" button
- Wait for import to complete (should show green success message)
- Verify tables are created (should see 15+ tables)
💡 Verify Import Success: After import, you should see tables like: users, server_list, site_options, reseller_list, admin, activity_logs, etc.
Step 6: Configure Database Connection
- Open
/includes/config.phpin text editor (Notepad++, VS Code) - Find database configuration section (around line 10-20)
- Update with your database credentials:
// Database Configuration define('DB_HOST', 'localhost'); // Database host define('DB_USER', 'username_vpn_user'); // Your database username define('DB_PASS', 'your_generated_password'); // Your database password define('DB_NAME', 'username_vpn_panel'); // Your database name - Save the file
- Upload modified
config.phpback to server - Overwrite existing file when prompted
⚠️ Security: Set config.php permission to 644 (not 777) to prevent unauthorized access.
⚙️ PART 3: INITIAL CONFIGURATION
Step 7: First Login to Panel
- Open your browser (Chrome, Firefox recommended)
- Navigate to:
https://yourdomain.com - You should see the login page
- Use default credentials:
- Username:
admin - Password:
admin123
- Username:
- Click "Login" button
- You should be redirected to the dashboard
🔒 CRITICAL SECURITY: You MUST change the default admin password immediately! Default credentials are publicly known and pose a serious security risk.
Step 8: Change Admin Password
- After login, navigate to: Developer Settings (sidebar menu)
- Scroll to "Administrator" section
- Change username (optional but recommended):
- Enter new username in "Username" field
- Change password (REQUIRED):
- Enter strong password in "Password" field
- Use mix of uppercase, lowercase, numbers, symbols
- Minimum 12 characters recommended
- Click "Confirm" button
- Click "Authorize" in confirmation popup
- Wait for success notification
- Logout and login with new credentials to verify
Step 9: Setup GitHub Integration
Step A: Create GitHub Repositories
- Login to GitHub (
https://github.com) - Create first repository:
- Click "New repository" button
- Name:
server_script - Visibility: Private or Public (your choice)
- Initialize: Check "Add README"
- Click "Create repository"
- Create second repository:
- Name:
yourdomain.com(use your actual domain) - Visibility: Private or Public
- Initialize: Check "Add README"
- Click "Create repository"
- Name:
- In
server_scriptrepository, create branch namedserver_script - In
yourdomain.comrepository, create branch namedserver_script
Step B: Generate Personal Access Token (PAT)
- GitHub → Click your profile → Settings
- Scroll down → Developer settings
- Personal access tokens → Tokens (classic)
- Click "Generate new token (classic)"
- Note:
VPN Panel Access - Expiration:
No expiration(or 1 year) - Select scopes: Check "repo" (Full control of private repositories)
- Scroll down and click "Generate token"
- COPY THE TOKEN IMMEDIATELY (you won't see it again!)
- Save token in secure location
Step C: Configure Panel Settings
- Go to: Developer Settings in panel
- Scroll to "GitHub Integration" section
- Fill in the following:
- Github Username: Your GitHub username (e.g.,
johndoe) - Github Token: Paste the PAT you generated
- Github Repository Domain: Your domain (e.g.,
yourdomain.com)
- Github Username: Your GitHub username (e.g.,
- Click "Confirm" button
- Click "Authorize" in popup
- Wait for success message
💡 Why GitHub? GitHub integration enables automated script versioning, deployment logging, and centralized script management.
Step 10: Upload VPN Installation Scripts
- Go to your
server_scriptrepository on GitHub - Switch to
server_scriptbranch - Upload installation scripts (provided in package
/scripts/folder):- debian_ovpn
- v2ray_install
- vless_setup
- hysteria_install
- hysteria2_setup
- obfs_salamander
- Commit the files with message:
Add VPN installation scripts - Verify scripts are in
server_scriptbranch
✓ Scripts Included: All installation scripts are provided in the package under /scripts/ folder.
🖥️ PART 4: ADD YOUR FIRST VPN SERVER
Step 11: Prepare VPS Server
- Purchase VPS from provider (DigitalOcean, Vultr, Linode, etc.)
- Recommended specifications:
- OS: Debian 11 or Ubuntu 22.04 LTS
- RAM: 1GB minimum (2GB recommended)
- CPU: 1 core minimum
- Storage: 20GB SSD
- Bandwidth: Unlimited or 1TB+
- Note down server details:
- IP Address:
123.456.789.012 - Root Password:
your_vps_password - SSH Port:
22(default)
- IP Address:
- Ensure SSH is accessible (test with PuTTY or terminal)
Step 12: Add Server in Panel
- Login to panel
- Navigate to: Server → Add Server
- Fill in server configuration:
| Field | Example Value | Description |
|---|---|---|
| Server Name | USA Server 1 | Display name for users |
| Server IP | 123.456.789.012 | VPS IP address |
| SSH Username | root | SSH login username |
| SSH Password | your_vps_password | SSH login password |
| Service | debian_ovpn | Installation script to use |
| TCP Port | 443 | OpenVPN TCP port |
| UDP Port | 7300 | OpenVPN UDP port |
| SSL Port | 444 | OpenVPN SSL/TLS port |
| Server Flag | usa.png | Country flag image |
- Click "Submit" button
- Wait for installation (5-10 minutes)
- Monitor progress in notification area
💡 What Happens During Installation:
- Panel connects to VPS via SSH
- Downloads installation script from GitHub
- Executes script on VPS (installs OpenVPN, configures ports)
- Generates server configuration
- Pushes configuration log to GitHub
- Updates server status in panel database
Step 13: Verify Installation Success
Check Panel:
- Server appears in server list
- Status shows "Online" or "Active"
- Server details are visible and correct
- No error messages in notifications
Check GitHub:
- Go to
yourdomain.comrepository - Switch to
server_scriptbranch - You should see new commit with server configuration
- Commit message includes server IP and timestamp
Check VPS (Optional):
- SSH into your VPS:
ssh [email protected] - Check OpenVPN status:
systemctl status openvpn - Should show "active (running)"
- Check script file:
ls -la /usr/local/etc/.system/ - Should see configuration files
✅ Installation Complete! If all checks pass, your VPN server is ready to accept connections!
👥 PART 5: CREATE FIRST USER
Step 14: Add User Account
- Navigate to: Users → Add User
- Fill in user details:
- Username: testuser (user's login name)
- Password: SecurePass123 (user's password)
- Duration: 30 (number of days)
- Expiry Date: Auto-calculated from duration
- Device Limit: 2 (max concurrent connections)
- Click "Submit" button
- User account created instantly
- User can now connect to VPN using credentials
🎉 OPTIONAL CONFIGURATIONS
Step 15: Cloudflare Turnstile (Optional)
- Go to Cloudflare Turnstile:
https://dash.cloudflare.com/ - Navigate to Turnstile section
- Create new site widget
- Copy Site Key and Secret Key
- In panel: Developer Settings
- Paste keys in Turnstile fields
- Save settings
- CAPTCHA protection now active on login page
Step 16: Automated Database Backup (Optional)
Setup Email Backup:
- Go to: Developer Settings
- Scroll to "Database Backup" section
- Enter recipient email address
- Click "Confirm" → "Authorize"
- Test by clicking "Backup" button
- Check email for backup SQL file
Setup Cron Job (Automated Daily Backup):
- Login to cPanel
- Open "Cron Jobs" tool
- Add new cron job:
- Minute:
0 - Hour:
2(2 AM) - Day:
* - Month:
* - Weekday:
* - Command:
php /home/username/public_html/includes/cronjob/cronjob_backup.php
- Minute:
- Click "Add New Cron Job"
- Backup will run daily at 2 AM
✅ INSTALLATION COMPLETE!
🎊 Congratulations!
Your VPN Panel Pro is fully installed and ready to use. You can now:
- Add more VPN servers in different locations
- Create reseller accounts for sub-management
- Customize panel branding and colors
- Set up additional protocols (V2Ray, Hysteria)
- Configure Cloudflare DNS automation
- Monitor user connections and server status
🆘 TROUBLESHOOTING
| Issue | Solution |
|---|---|
| Blank page after upload | Check file permissions, ensure templates_c is 777, verify PHP version |
| Database connection error | Verify credentials in config.php, check database exists |
| Server installation fails | Check SSH credentials, verify OS is Debian/Ubuntu, ensure SSH2 extension enabled |
| GitHub logs not appearing | Verify PAT has "repo" permission, check repository exists |
| Can't login to panel | Use default: admin/admin123, clear browser cache, check database import |
| SSH2 extension missing | Contact hosting support to enable SSH2 |
Check Log Files:
/logs/php_errors.log- PHP errors and warnings/logs/push_api.log- GitHub API calls and responses/logs/server_install.log- Server installation logs/logs/activity.log- User activity and actions
📞 SUPPORT
Need Help? If you encounter issues during installation:
- Check the troubleshooting section above
- Review log files for error messages
- Verify all requirements are met
- Contact support with your purchase code
- Provide error logs for faster resolution
🚀 Ready to Launch!
Your VPN business is now operational. Start adding servers, creating users, and growing your service!



Comments (0)
Item Details

| Price |
$299
|
| Views |
2.1 K
|
| Version |
29 March 2026
|
| Last Update |
02-Apr-2026
|
| Release Date |
02-Apr-2026
|
| Category | |
Order Confirmation
Please confirm your order. Once you confirm, the total amount will be deducted from your wallet, and the order will be placed. If you wish to make any changes, you can edit your order before pay.
By confirming, you also agree to our refund policy. Please make sure you've read and understood the terms.
Note: Coupon is applicable for items above $50